Sanyo VA-50LAN User Manual
Browse online or download User Manual for Security cameras Sanyo VA-50LAN. Sanyo VA-50LAN User's Manual
- Page / 60
- Table of contents
- BOOKMARKS
- VA-50LAN 1
- Fixer (blue) 3
- Retainer 3
- Fixer (black) 3
- LAN port 3
- “PORT” setting 5
- 1 Accessing the camera 6
- Refer to 7
- Specifications 9
- Screen Sequence 10
- (LAN) erforderlich sind 14
- 1 Zugriff auf die Kamera 16
- Technische Daten 19
- Menüfolge 20
- 1 Accès à la caméra 26
- Reportez-vous à 27
- Spécifications 29
- Séquence des écrans 30
- 1 Acceso a la cámara 36
- Consultar 37
- Especificaciones 39
- Secuencia de pantalla 40
- 1. 安装选项板 42
- 固定器 (蓝色) 43
- 固定器 (黑色) 43
- 2. 配置网络设定 44
- 3. 摄像机操作到网络操作流程 46
- 4. VA-SW3050LITE 的软件设置过程 47
- 安装 VA-SW3050LITE 软件 48
- • カメラ本体に付属の設置説明書をご参照ください。 52
- フィクサー(青) 53
- フィクサー(黒) 53
- 2.ネットワークの設定をおこなう 54
- 3.ネットワーク操作までの流れ 56
- ■ CD-ROMの使用許諾について 59
- ■ 著作権について 59
- SANYO Electric Co., Ltd 60
Summary of Contents
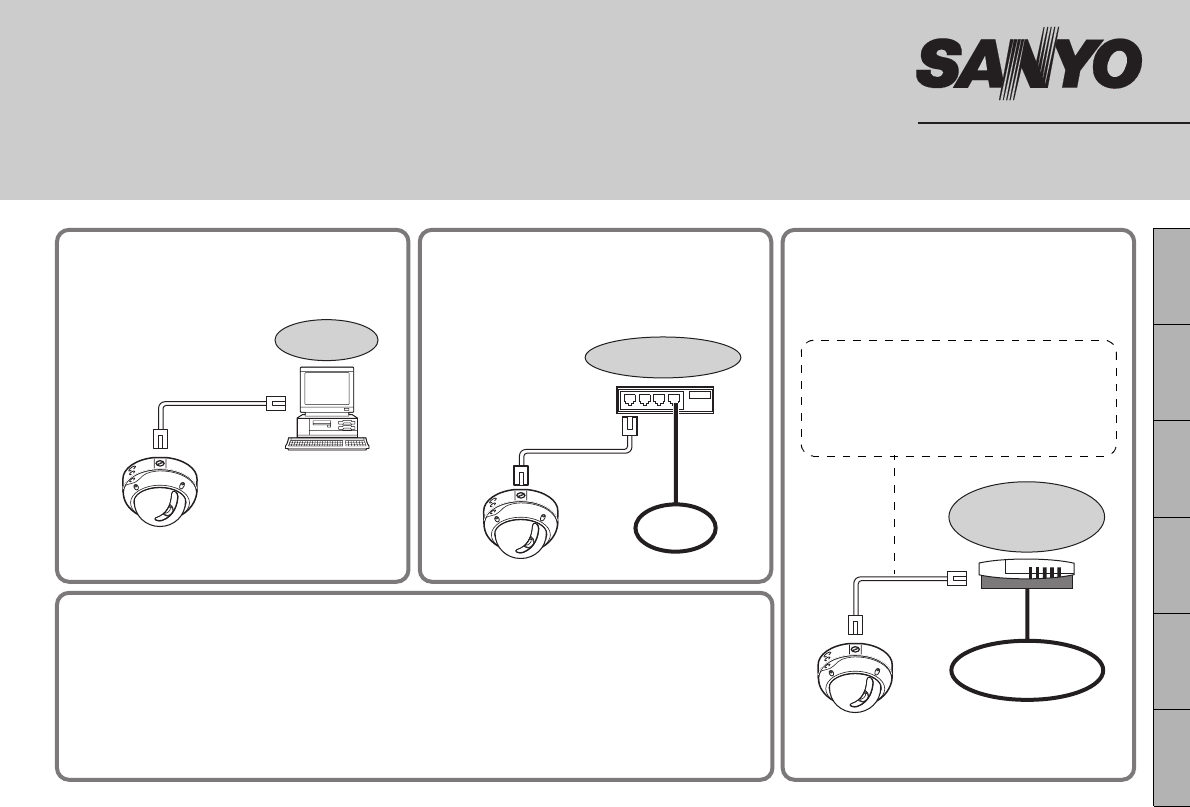
English Deutsch Français Español中文简体日本語 Direct connectionConnect the camera to your PC using a LAN cable (crossover type).LAN cable (crossover type)P
10Screen Sequence SYNC BLC IRIS WHITE BALANCE AGC GAIN GAMMA SHUTTER APERTURE DAY/NIGHT·OPTION PRESET MENUINTOFFSET y ATWNORM0.4560HIGHAUTO ySET yO
English Deutsch Français Español中文简体日本語 Direkter AnschlussSchließen Sie die Kamera mit einem LAN-Kabel (Crossover-Kabel) an Ihren PC an.LAN-Netzwerkk
21. Installieren der OptionskarteNehmen Sie die Abdeckkappe und dann die Objektiveinheit ab. Bringen Sie die Abdeckkappe nach Abschluss der Einstellun
31. Installieren der Optionskarte7Verbinden Sie das durch die Öffnung im Boden der Kameraeinheit kommende LAN-Kabel mit dem LAN-Anschluss.8Befestigen
42. Konfiguration der NetzwerkeinstellungenKonfigurieren Sie im entsprechenden Menüfenster die Einstellungen, die für den Anschluss der Kamera an das
52. Konfiguration der Netzwerkeinstellungen3Wählen Sie die zu ändernde Ziffer aus und legen Sie den Wert fest.• Wiederholen Sie Schritt 3 nach Bedarf.
63. Ablauf der Kamerabedienung durch NetzwerkbetriebGehen Sie wie im Folgenden beschrieben vor und schlagen Sie zu diesem Zweck in der detaillierten B
74.Vorgehensweise zum Einrichten der Software VA-SW3050LITEDas Programm VA-SW3050LITE kann für die Überwachung von bis zu 128 Kameras verwendet werden
8Installation des Programms VA-SW3050LITEStarten Sie das Installationsprogramm von der Software-CD und benutzen Sie die interaktiven Dialogfelder für
9Technische DatenÄnderungen des Aussehens und der technischen Daten ohne Vorankündigung oder sonstige Verpflichtungen bleiben vorbehalten. Lizenz für
21. Installing the Option BoardRemove the dome cover and then the lens assembly. Place the dome cover back once you have finished the settings.• Pleas
10Menüfolge IP-ADRESSE EINST.·IP-ADRESSE 192.168.000.002 SUBNETZMASKE 255.255.255.000 GATEWAY 192.168.000.001 MENUEZURUECK N
English Deutsch Français Español中文简体日本語 Connexion directeReliez la caméra à votre ordinateur personnel en utilisant un câble LAN (de type croisé).Câb
21. Installation de la carte optionnelleOtez le couvercle du dôme puis l’ensemble objectif. Une fois les réglages effectués, remettez le couvercle du
31. Installation de la carte optionnelle7Branchez le câble LAN sortant du trou situé dans la partie inférieure du groupe caméra dans le port LAN.8En u
42. Configuration des réglages de réseauDans l’écran de menu, configurez les réglages requis pour la connexion de la caméra au réseau (LAN). • Pour ac
52. Configuration des réglages de réseau3Sélectionnez le chiffre à modifier et spécifiez une valeur.• Répétez si nécessaire le point 3.• Pour modifier
63. Flux de fonctionnement de la caméra par l’intermédiaire d’une opération réseauEffectuez les procédures suivantes en vous reportant aux instruction
74. Procédure d’installation du logiciel VA-SW3050LITELe logiciel VA-SW3050LITE permet une surveillance multiple en utilisant jusqu’à 128 caméras ains
8Installation du logiciel VA-SW3050LITELancez le programme d’installation depuis le CD du logiciel, et utilisez les boîtes de dialogue interactives po
9SpécificationsL’aspect et les spécifications peuvent être modifiés sans préavis ou obligations. Licence pour le logiciel contenu dans le CD-ROM• Veu
31. Installing the Option Board7Connect the LAN cable coming out from the hole at the bottom of the camera unit to the LAN port.8Using both the fixer
10Séquence des écrans SYNC BLC IRIS EQUIL BLANC GAIN CAG GAMMA VIT OBTURATEUR OUVERTURE JOUR/NUIT·OPTION PREREGLAGE MENUINTARRREG yATWNORM0.4560HAUTA
English Deutsch Français Español中文简体日本語 Conexión directaConectar la cámara al PC mediante el cable LAN (tipo cruzado).Cable LAN (cruzado)PC Conexión
21. Instalación de la placa opcionalQuitar la tapa de la cúpula y a continuación el conjunto de la lente. Volver a colocar la tapa de la cúpula una ve
31. Instalación de la placa opcional7Conectar el cable LAN que sale del orificio de la parte inferior de la unidad de la cámara al puerto LAN.8Usando
42. Configuración de los ajustes de redConfigurar los ajustes necesarios para la conexión de la cámara a la red (LAN) en la pantalla del menú. • Para
52. Configuración de los ajustes de red3Seleccionar el dígito a cambiar y especificar el valor.• Repetir el punto 3 si es necesario. • Si se desea cam
63. Flujo de funcionamiento de la cámara a través del funcionamiento de redLlevar a efecto los siguientes procedimientos siguiendo las instrucciones d
74. Procedimiento de configuración del Software para VA-SW3050LITEMediante el software VA-SW3050LITE se logra la monitorización múltiple usando hasta
8Instalación del software VA-SW3050LITEIniciar el programa de instalación del CD de software y usar los cuadros de diálogo interactivos para avanzar
9EspecificacionesEl aspecto y las características técnicas pueden sufrir variaciones sin previo aviso u obligación. Licencia para software contenida
42. Configuring the Network SettingsConfigure the settings required for connecting the camera to the network (LAN) in the menu screen.• For accessing
10Secuencia de pantalla SINC BLC IRIS BALANCE BLANCO GANANCIA AGC GAMMA VELO OBTURADOR APERTURA DIA/NOCHE·OPCION PREAJUSTES MENUINTOFFAJU yATWNORM0.4
English Deutsch Français Español中文简体日本語 直接连接使用 LAN 电缆 (交叉型)将摄像机连接到您的 PC 上。LAN 电缆(交叉型)PC LAN连接使用 LAN 电缆 (直线型)通过交换集线器将摄像机连接到 LAN。LAN 电缆(直线型)交换集线器LAN
21. 安装选项板先后取下球罩和镜头组件。 完成设定后,请将球罩还原。• 请参阅摄像机随附的安装手册。1将选项板管脚连接器电缆连接到镜头组件背面的COM/NET端子。2将选项板上的垫圈放入镜头组件 (2处)。3使用选项板随附的螺钉从背面固定选项板(3处)。4卸下防脱落挂绳,然后用螺钉将其与随附的固定
31. 安装选项板7将从摄像机装置底部的孔中拉出的LAN电缆连接到LAN端口。8使用固定器 (蓝色和黑色)将LAN电缆和CN406电缆固定到盒上。注:• 固定 LAN 电缆之前,请将固定器 (黑色)穿过座圈。• 当使用加热器 (VA - 5 0 H ,选项板)时,请确保 LAN 电缆未接触加热器。•
42. 配置网络设定在菜单屏幕中配置将摄像机连接到网络 (LAN) 所需的设定。• 有关访问主菜单的信息,请参见摄像机随附的说明手册第 5 - 7 页。• 打开电源后,“NETWORK”设定菜单出现在 “OPTION”屏幕上大约需要一分钟时间。1选择 “IP ADDRESS”,指定用于检索IP地址的
52. 配置网络设定3选择要更改的数字并指定值。• 根据需要重复步骤 3。 • 当希望更改其他项目时,请返回到步骤2。4将“MENU”设定为 “BACK”,然后按SET按钮。R返回到 “NETWORK SETTING”屏幕。 5必要时更改端口号(0-65535)。R端口号下面显示 “x”。6选择要更
63. 摄像机操作到网络操作流程参阅随附光盘中包含的说明手册 [VA-50LAN_MANUAL],并按其中给出的详细说明执行以下步骤。参阅1 访问摄像机输入您的用户名和密码,然后选择您要在屏幕上显示的语言。用户名: admin密码: admin652 在主屏幕上显示来自摄像机的实况视频 853 配置
74. VA-SW3050LITE 的软件设置过程VA-SW3050LITE 软件可以通过使用最多 128 个摄像机来完成多个监控,并且允许在包括 4 帧和 16 帧视图的多个选项之间进行帧转换。参阅随附光盘中包含的说明手册 [VA-SW3050LITE_MANUAL],并按其中给出的详细说明执行以
8安装 VA-SW3050LITE 软件从软件光盘启动安装程序,使用交互对话框进入安装过程。1双击随附光盘中包含的 “Setup.exe”。2“Welcome to the InstallShield Wizard for VA-SW3050LITE”对话框随即出现。 单击 [Next]。3“Lic
9规格产品外观和规格如有变更,恕不另行通告,也不承担责任。 光盘中包含的软件许可协议• 在软件安装过程中,请仔细阅读屏幕上出现的许可协议中包含的条件和条款。只要您在此同意所有条件和条款,您即可依许可协议的规定使用软件。• 有关由光盘中介绍的第三方提供的其它产品或服务的信息,请与每个供应商或制造商联
52. Configuring the Network Settings3Select the digit to be changed, and specify the value.• Repeat step 3 as required. • When you want to change othe
10屏幕顺序 SYNC BLC IRIS WHITE BALANCE AGC GAIN GAMMA SHUTTER APERTURE DAY/NIGHT·OPTION PRESET MENUINTOFFSET y ATWNORM0.4560HIGHAUTO ySET yOFFEND
English Deutsch Français Español中文简体日本語 基本接続カメラとパソコン間を LAN ケーブル(クロスタイプ)で接続します。LAN ケーブル(クロスタイプ)パソコン LAN接続スイッチングハブなどを使って LAN とカメラを LAN ケーブル(ストレートタイプ)で
21.取り付け方ドームカバーをはずし、レンズ基板をとりはずしてください。設定が完了したら、ドームカバーを取り付けてください。• カメラ本体に付属の設置説明書をご参照ください。1オプションボードのピンコネクタをレンズ基板の裏面COM/NET端子に接続する2オプションボードのスペーサーをレンズ基板に差し
31. 取り付け方7底穴から通したLANケーブルをLANソケットに接続する8付属のフィクサー(青、黒)を使い、LANケーブルとCN406ケーブルを固定する注意 : • フィクサー ( 黒 ) はラッチに通して固定してください。• ヒーター(VA-50H;オプションボード)をご使用の場合は、LAN ケ
42.ネットワークの設定をおこなうカメラをネットワーク (LAN) に接続するために必要な項目をメニュー画面で設定してください。• メインメニューへのアクセス方法は、カメラ本体に付属の取扱説明書 5-7 ページをご参照ください。• 電源を入れてから、約 1 分で設定可能になります。1“IP ADDR
52. ネットワークの設定をおこなう3変更する数字を選び、変更する• 必要に応じて手順 3 を繰り返してください。• 他の項目を変更する場合は、手順 2 に戻ってください。4“MENU”の“BACK”を選び、SETボタンを押すRNETOWORK SETTING 画面に戻ります。5必要であれば、ポート
63.ネットワーク操作までの流れ付属の CD-ROM 内の取扱説明書 [VA-50LAN_MANUAL] を参照しながら操作を進めてください。参照ページ1 カメラにアクセスするユーザー名とパスワードを入力して、画面の表示言語を選んでください。ユーザー名:adminパスワード:admin652 カメラ
74. 本ソフトウェア (VA-SW3050LITE) をご利用になるまでの流れ複数台のカメラで監視(最大 128 台)したり、4 画面や 16 画面に切り換えができる監視用ソフトウェアです。付属の CD-ROM 内の取扱説明書 [VA-SW3050LITE_MANUAL] を参照しながら操作を進め
8本ソフトウェア (VA-SW3050LITE) をインストールする画面との会話形式でインストールをおこなってください。1付属のCD-ROM内の“Setup.exe”をダブルクリックする2「VA-SW3050LITE セットアップウィザードの開始」[ 次へ (N)>] をクリックする3「使用許
9仕様外観及び仕様は、お断りなしに変更する場合がありますのでご了承ください。 CD-ROMの使用許諾について• 本 CD-ROMに収納されているソフトウェアのインストールにあたっては、インストール字に表示されるソフトウェアの使用許諾契約内容をご確認のうえ、同意された内容において使用することができま
63. Flow of Camera Operation through to Network OperationPerform the following procedures according to the detailed instructions given in the INSTRUCT
Printed in JapanSANYO Electric Co., Ltd.設定画面一覧 SYNC BLC IRIS WHITE BALANCE AGC GAIN GAMMA SHUTTER APERTURE DAY/NIGHT·OPTION PRESET MENUINTOFFSET y A
74. Software Setup Procedure for VA-SW3050LITEThe VA-SW3050LITE software achieves multiple monitoring by using up to 128 cameras and allows frame swit
8Installing the VA-SW3050LITE SoftwareStart the installation program from the software CD, and use the interactive dialog boxes to advance the install
9SpecificationsAppearance and specifications are subject to change without prior notice or obligations. License for Software Contained in CD-ROM• Ple
Related products and manuals for Security cameras Sanyo VA-50LAN
 (16 pages)
(20 pages)
(16 pages)
(20 pages)
© 2020, manymanuals.com. All rights reserved. | 2.830 s |
 Manymanuals.com
 Manymanuals.de
 Manymanuals.fr
 Manymanuals.it
 Manymanuals.pl
 Manymanuals.cz
 Manymanuals.es
 Manymanuals-pt.com
Comments to this Manuals